If you are a food blogger or even just love taking beautiful photos, then you know how important the editing process is to create those delicious, vibrant looking photos that make you want to reach through your computer screen and immediately devour whatever dish you are currently salivating over! Pinterest can definitely be a dangerous place when you are hungry, but as most of you already know, it’s a food blogger’s best friend and having those perfect food photos are important not only to drive traffic to your site, but to enhance your blog and entice people to make those delicious recipes you’ve worked so hard on. Of course it’s important to first try and capture your food photography as best you can first using your camera, but editing programs really have the ability of taking your photos to the next level!
I personally have been using Adobe Photoshop and Lightroom for over 5 years now and absolutely could not live without these programs! Literally about 95% of all my food photos have been edited using Adobe software and I love both Photoshop and Lightroom for different reasons, but because I’ve been obsessed with Lightroom lately, I really wanted to share my tips and tricks for easily getting those beautiful food photos with just a few simple edits!
First thing’s first, let’s import these photos into Lightroom!
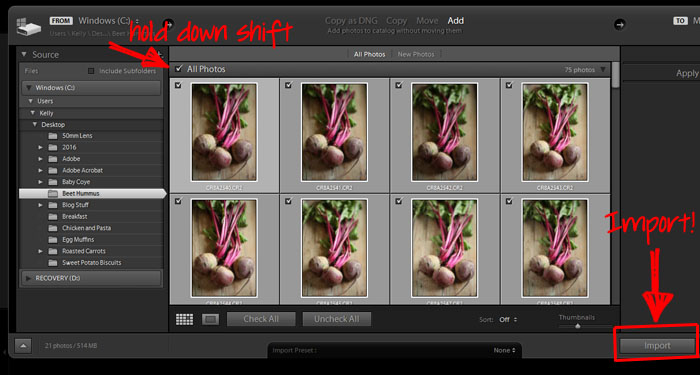
As you can see I’ve uploaded several photos of these beets that I photographed for a delicious hummus recipe that is coming to the blog soon. For this tutorial I only want the beets imported and not ALL of the pictures in my folder so a little trick that I like to do is click the first photo in the section, hold down the shift key and then click the last of the photos that I want to use. This will quickly select ONLY the group of photos that you want to edit and then just simply click import! Once the photos have been imported onto Lightroom you’ll want to create a folder for them so they’ll be nice and organized as well as easy to find.
Editing Photos
Now that your photos have been imported, it’s time to do some editing! I personally like to go through first and delete any photos I know I won’t be using so that I only have my favorites to edit, but this step is of course completely up to you. To do this, just click on the photos you want to delete and hit the backspace button. Lightroom will ask you if you want to delete them from the disk or just remove them from Lightroom. I always hit “remove” and boom done! Easy peasy. Okay so let’s dive into the fun stuff – the editing process!
When I first started editing photos I found that I was almost always using the same edits for all of my food shots so I quickly learned how to create my own saved presets in Lightroom which not only saves me loads of editing time, but it also helps to keep my photos looking consistent on my site. You can literally change your entire photo with just one click! Lightroom allows you to save multiple presets (or even download pre-made ones), but for this tutorial I’ll show you my usual Lightroom workflow and how you can easily save the edits to use on other photos.
Tilting and Cropping
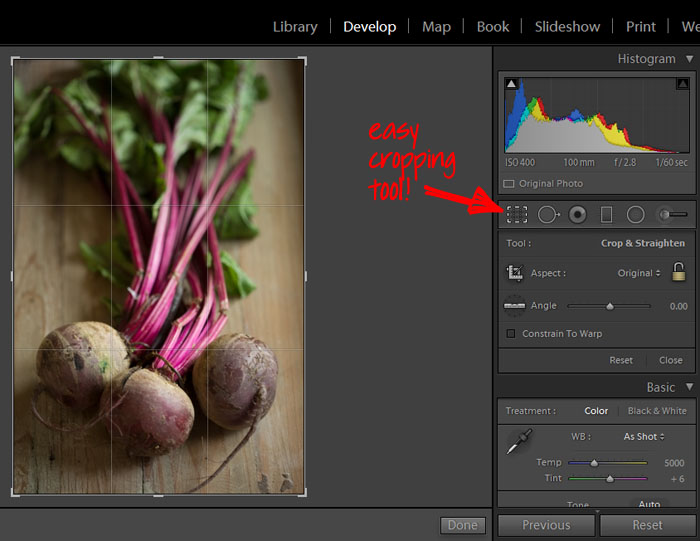
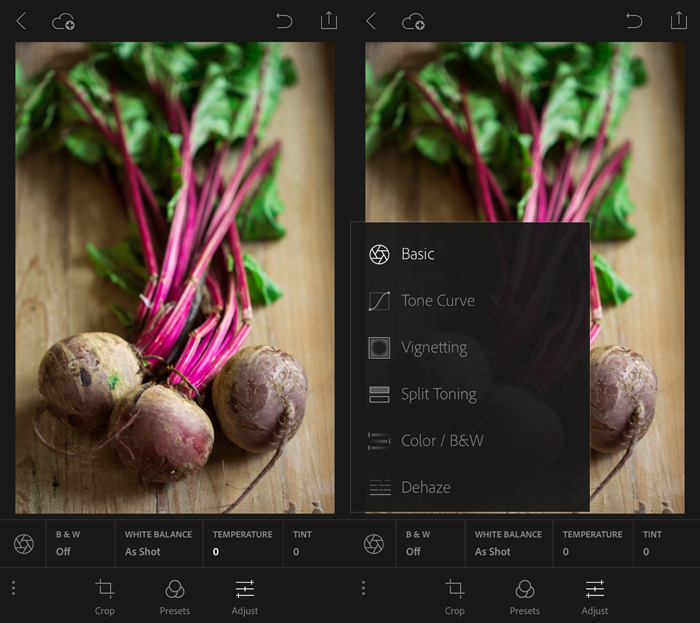
Make sure you are under the “develop” tab now from this point forward as this is where you will be doing all of your editing. The first thing I always do is see if my photo needs to be cropped or tilted in order to remove any outside edges that don’t need to be in the photo or to zoom in on a particular area to enhance whatever look you are trying to achieve. This particular photo doesn’t really need much cropping, but I wanted to show you this super helpful tool anyway!
White Balance
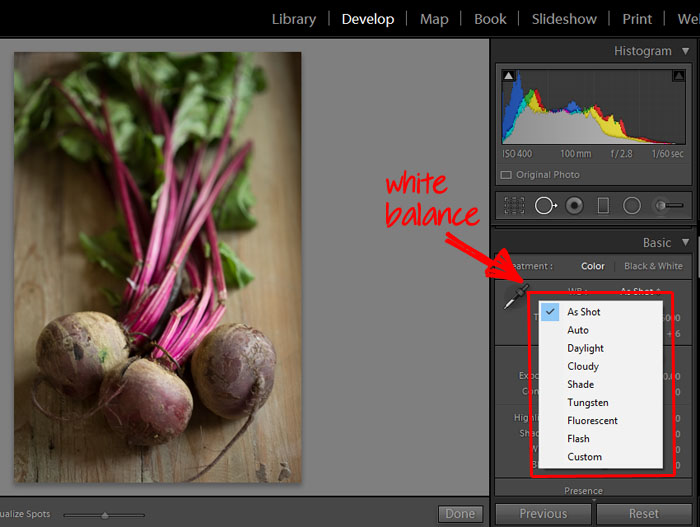
White balance is one of the most important factors in food photography that you want to make sure you understand. Although as much as we try to capture the perfect shot within our camera first, often times the natural lighting is a bit harsh or too dark and we need to go in and adjust the white balance in our editing software. You will find this option under the basic edits tab on the right sidebar and I just love the options Lightroom gives you! Usually I keep the white balance “as shot” since I try to capture the best white balance in my actual camera when taking the photo, but this option is totally worth mentioning. Now there are a few different ways you can adjust the white balance in Lightroom – one way is by using the little dropper which is the white balance selector or you can choose from a list of white balance settings that are similar to the settings in your DSLR camera. Some of these can turn out pretty extreme, but depending on the look you are going for they may be really helpful.
For this particular photo I’m going to keep my white balance on “as shot.”
Basic Edits
Once I’m happy with the white balance in my photo, I then move on to the basic edits. This is where I usually just hit a saved preset (as I mentioned above) which makes this process super fast and easy, but let’s go through my typical workflow so you can try them yourself! Here is a list of all the edits I typically use although they do vary depending on the photo.
- First I bumped up the exposure just a bit to brighten things up and increase the amount of light in my photo. I love having great light in my photos, but be careful not to increase the exposure too much as highlights and bright spots can get blown out.
- Next I boosted the contrast a bit just to make the colors stand out a little more.
- For this particular photo I actually decreased the highlights a bit because the light on the beets were pretty bright to begin with. Toning down these highlights shows off more detail and removes that harsh light.
- Next we can adjust the shadows which is something I really like to play around with as shadows add so much depth and texture to a photo. I actually really like the way the shadows look in this photo already so I’m going to move on to the next set of adjustments.
- The whites and blacks adjustments are another great way of lightning or darkening a photo. In this photo I don’t really have any whites or blacks that I’d like to enhance so I’m going to leave these alone.
- Next I adjusted the clarity a bit giving the beets a little more texture and definition. If you were to move the adjustment bar all the way to the left, however, you would notice that the image becomes super soft and a bit fuzzy. Again this all depends on the look you are trying to achieve!
- The vibrance and saturation adjustments are next and these are really important for making those colors stand out! I usually don’t mess around with the saturation too much only because I want the colors to look as natural as possible, but for this photo I did bump up the vibrance a little bit.
Let’s take a look at what we have so far!
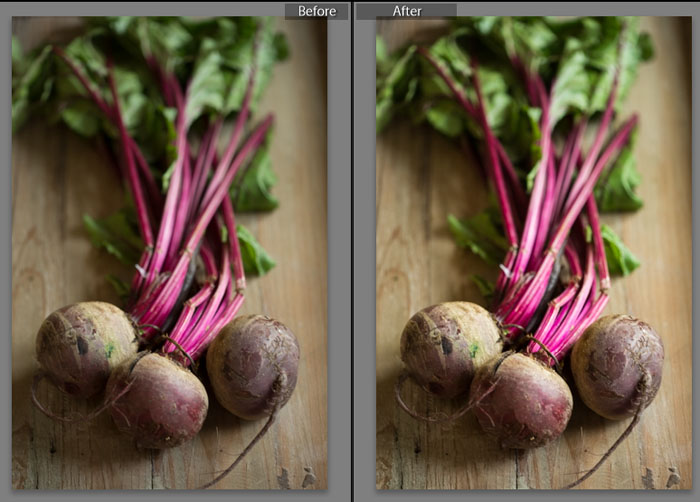
As you can see the beets have been brightened up and look more defined in some areas. Plus how cool is this trick Lightroom does to show you the side-by-side before and after shots so you can look at your changes! Now let’s take a look at the next set of adjustments that just so happen to be a total favorite of mine.
Specific Color Adjustments
These are by far some of my favorite adjustments when editing photos, specifically when I shoot leafy greens and veggies! This photo of the beets makes a great example because of how gorgeous the purple coloring is next to the pretty green leaves. For these edits I basically just bumped up the greens under the “hue” tab and then adjusted the magenta color under the “saturation” tab. I also noticed that there were a ton of highlights on the beets taking away from the coloring so I toned down the magenta highlights under the “luminance” tab to show off that gorgeous color.
No let’s take a look at what these changes look like!
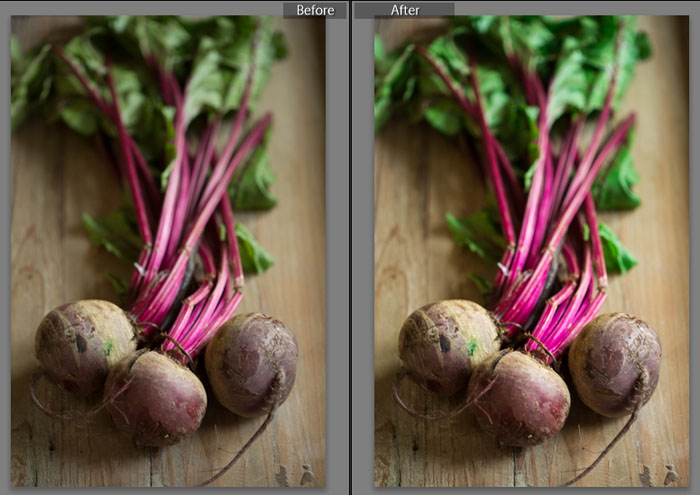
Do you see the difference in the colors?? I just love how everything looks super fresh and vibrant. I mean there is nothing worse than photos of dull green produce that make you want to never eat a salad again so if you want your images to really stand out this is a great tool to use!
Sharpening
Last, but not least there is the sharpening feature which really helps make the little details stand out. Be careful with this tool because you really don’t want to over-sharpen your image because, as I’ve said before, you really want your photos to look as natural as possible. For this particular photo I did expand the radius a bit and sharpened everything a little bit more. I really wanted to highlight the texture of the beets as well as the ridges on the stems. Photoshop actually has a great sharpening tool as well that I like to use so often times I’ll use both programs when editing photos.
Now there are still SO many other features included in Lightroom that you can use to edit and enhance your photos such as the spot removal feature, the adjustment brush, different filters, etc., but the edits I’ve shown you are really all you need to achieve a beautiful food photo!
Adobe Lightroom Mobile App
Yes it is true!! Adobe Lightroom now has a mobile app where you can easily upload and edit photos right on your phone which I love using when posting photos on Instagram or Facebook. Here are some awesome features worth noting:
- You can easily import photos right from your camera roll OR sync collections of photos already saved in Lightroom from your computer.
- You can also take photos immediately within the Lightroom app itself by hitting the camera icon.
- Lightroom makes editing photos such a breeze with a super user-friendly tool bar where you can crop images, apply presets, or use the adjustment settings to fix the contrast, vibrance, white balance, etc.
- Just as Lightroom on your computer can save your edits, the mobile app can also save your edits from previous photos!
- You can also share your edited photos on Instagram, Twitter, email and more.
Best part is you can now sign up for the Creative Cloud Photography Plan for only $10 a month! Not only does this give you access to Lightroom and the mobile app, but you will also have access to Adobe Photoshop which is another amazing program!! Seriously I can’t stress enough what an incredible deal this is – when I first started using Adobe they unfortunately didn’t offer this plan so I ended up shelling out hundreds of dollars to use these programs which YES was completely worth the investment because they are absolutely necessary for my food photography, but having access to BOTH Lightroom and Photoshop for only $10 a month is such an incredible steal! Creative Cloud is super affordable, easy to download and is instantly added to your computer. Another great aspect I love about Lightroom is that you can easily access and edit your photos within the software, on any internet browser and from the mobile app! And I mean c’mon, we spend more than $10 a month on Starbucks….am I right?? 😉
To get started today with the Creative Cloud Photography Plan, click here!
Giveaway!!
Now get excited because Adobe has generously offered one lucky reader the chance to win a full year of FREE access to the entire Creative Cloud Photography Plan!! This of course includes Adobe Lightroom, Photoshop and complete access to the mobile app – a $120 value! Enter below to win!
Best of luck to you all with this incredible giveaway and please let me know in the comments section if you have any questions at all! I have personally used Adobe products for years and find that even though both Photoshop and Lightroom are different programs, they do both help to achieve amazing photos. Let me know if you’d be interested specifically in a Photoshop tutorial because I’d be happy so share one! There are lots of different tips and tricks within Photoshop that you can’t really do in Lightroom, while Lightroom of course has incredible features that Photoshop doesn’t have. This is why I like them each individually and often times use them together!
This post is sponsored by Adobe. As always all opinions are 100% my own.


Your tips are really good. Can you provide some tips on how to do beautiful photo edit by photoshop?
Your blog isamazing! Love it so much
Thanks for taking the time to explain things in such great detail in a way that is easy to understand.
What a cool giveaway! I would love to get lightroom and photoshop on my macbook. Additionally adored your tips!